NSDL e-Sign Photo & Signature Resize Tools
Photo Resize
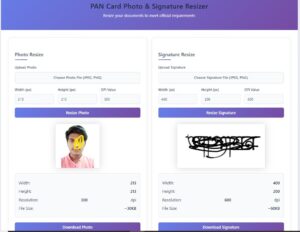
Width (cm): 2.5 Height (cm): 3.5 Resolution (dpi): 200 Max File size: 50kb
Signature Resize
Width (cm): 4.5 Height (cm): 2 Resolution (dpi): 200 Max File size: 50kb
In NSDL : Pan card Photo Signature Size :
| Sr. No. | Parameters | Photograph | Signature | Supporting documents |
| 1. | Resolution (in DPI) | 200 DPI | 200 DPI | 200 DPI |
| 2. | Type | Color | Color | Black & White |
| 3. | File type | JPEG | JPEG | PDF/A or JPEG |
| 4. | Size | Max. 20 KB | Max. 10 KB | Max. 300KB/per page |
| 5. | Dimension | 3.5X2.5 cms. | 2X4.5 cms |
In UTI Pan card Photo Signature Size :
1. a. PAN Application form (front & back side) to be scanned in 200dpi, color – PDFA format
b.Supporting Document (POI and POA as provided by applicant) to be scanned in 200dpi color, PDFA format
c. Based on the above points a and b the PAN Application and Supporting Documents need to be clubbed into a single file and uploaded to the server . The size of complete scanned file can be Maximum upto 2MB.
2.Photo Scanning 300 dpi , colour ,213 X 213 px (Size less than 30 kb) in JPEG format
3.Signature scanning 600 dpi ?black and white (less than 60 kb) in JPEG format
| Requirement | UTIITSL | NSDL |
|---|---|---|
| Photograph Size | Max 30 KB (JPEG) | Max 20 KB (JPEG) |
| Signature Size | Max 60 KB (JPEG) | Max 10 KB (JPEG) |
| Supporting Document | Max 2 MB (combined PDF/A) | Max 300 KB per page |
| Photo Dimensions | 213×213 pixels | 3.5×2.5 cm |
| Signature Dimensions | – | 2×4.5 cm |
| Document Format | PDF/A for combined files | PDF/A or JPEG per page |
Key Differences:
-
UTIITSL allows larger file sizes for photos (30KB vs 20KB) and signatures (60KB vs 10KB)
-
NSDL has stricter size limits but provides exact centimeter measurements
-
UTIITSL requires combining all documents into one PDF/A file (max 2MB)
-
NSDL accepts documents page by page (max 300KB per page) in PDF/A or JPEG
NSDL PAN Card Requirements
Photograph Specifications
-
Resolution: 200 DPI
-
Type: Color
-
File Format: JPEG
-
Maximum Size: 20 KB
-
Dimensions: 3.5 cm (width) x 2.5 cm (height)
Signature Specifications
-
Resolution: 200 DPI
-
Type: Color
-
File Format: JPEG
-
Maximum Size: 10 KB
-
Dimensions: 2 cm (width) x 4.5 cm (height)
Supporting Documents
-
Resolution: 200 DPI
-
Type: Black & White
-
File Format: PDF/A or JPEG
-
Maximum Size: 300 KB per page
UTIITSL PAN Card Requirements
Document Scanning Requirements
-
PAN Application Form (Front & Back):
-
Format: PDF/A
-
Resolution: 200 DPI
-
Color: Yes
-
-
Supporting Documents (POI & POA):
-
Format: PDF/A
-
Resolution: 200 DPI
-
Color: Yes
-
-
Final Upload:
-
All documents must be combined into a single PDF/A file
-
Maximum File Size: 2 MB
-
Photograph Specifications
-
Resolution: 300 DPI
-
Type: Color
-
File Format: JPEG
-
Maximum Size: 30 KB
-
Dimensions: 213 pixels (width) x 213 pixels (height)
Signature Specifications
-
Resolution: 600 DPI
-
Type: Black & White
-
File Format: JPEG
-
Maximum Size: 60 KB
How to Resize & Optimize for PAN Card Application?
For NSDL Applications
-
Use photo editing tools like Photoshop or Canva to adjust dimensions (3.5×2.5 cm for photo, 2×4.5 cm for signature)
-
Compress images using tools like TinyPNG or ILoveIMG to reduce file size
-
Ensure signatures are clear and scanned at 200 DPI
For UTIITSL Applications
-
Crop photos to 213×213 pixels (300 DPI)
-
Sign on white paper, scan at 600 DPI, and convert to black & white
-
Merge all documents into a single PDF/A file (max 2MB)
Common Mistakes to Avoid
-
Uploading blurry or low-resolution images
-
Using incorrect file formats (JPEG for NSDL photos/signatures, PDF/A for UTIITSL documents)
-
Exceeding file size limits (20KB for NSDL photos, 2MB for UTIITSL full application)
Final Tips for Successful PAN Application
-
Double-check NSDL/UTIITSL guidelines before submission
-
Use online compressors if file sizes exceed limits
-
Test upload before final submission to avoid rejection
By following these specifications, you can ensure a smooth PAN card application process.
Process Flow – Application of PAN Card through UTIITSL i.e. Physical mode
Step 1: VLE must login to Digital Seva Portalthrough their existing User Id and password
Step 2: Search PAN Card services
Step 3: Click on Pan Card Services
Step 4: A dashboard of UTIITSL PAN Online Services will open and click on VLE Users option
Step 5: Digital mode for filling an application for Form 49 A
Step 6: Under the Apply New PAN option click on Application for New PAN 49A
Step 7: Under the two available options select Physical Mode
Step 8: Before proceeding read all instructions carefully
Step 9: A reference number will appear on the screen
Step 10: Fill all required Personal Details.
Step 11: Select documents that will be uploaded as Identity Proof, Address proof, and DOB/DOI Proof
Step 12: After completion of form details, VLE will be directed to the payment gateway and enter password under the same.
Step 13: After that user will be redirected payment gateway and then enter 6 digit walled pin
Step 14: Window indicating successful payment transition will appear
Step 15: Aadhaar authentication will be completed
Step 16: Fill Contact & Parent Details
Step 17: Fill details under Address Details option
Step 18: AO Code details will be fetched
Step 19: Fill all required particulars under the Other Details option
Step 20: Under Documents Upload option, click on Submit option as no document is needed to be uploaded
Step 21: Acknowledgment slip for Form 49A along with application number will be generated
Step 22: Duly signed hard copy of all the documents i.e. Form 49, address proof, photo ID etc must be submitted to UTIITSL Zonal office.
Under the portal, other PAN services can also be processed as follows:
1: For uploading any supporting documents with application form, click on Apply New PAN,and further click on Upload Documents
2: For managing any changes or correction in existing PAN Card, click on Apply Change/Correction option
3: Click on PAN Objection for objection clearance
4: To track PAN application status, click on Track PAN option and track through Application Number
5: To check dashboard of 49A and CSF click on Dashboard MIS
Process Flow – Application of PAN Card through e-KYC i.e. Digital mode
Step 1: Login to Digital Seva Portal
Step 2: Search PAN Card services
Step 3: Click on Pan Card E-KYC Services
Step 4: A dashboard of UTIITSL PAN Online Services will open and click on VLE Users option
Step 5: Digital mode for filling an application for Form 49 A
Step 6: Under the Apply New PAN option click on Application for New PAN 49A
Step 7: Under the two available options select Digital Mode
Step 8: A reference number will appear on the screen
Step 9: Fill all required Personal Details
Step 10: After completion of form details, VLE will be directed to the payment gateway and enter password under the same.
Step 11: After that user will be redirected payment gateway and then enter 6 digit walled pin
Step 12: Window indicating successful payment transition will appear
Step 13: Select documents that will be uploaded as Identity Proof, Address proof, and DOB/DOI Proof
Step 14: Aadhaar authentication will be completed
Step 15: Fill Contact & Parent Details
Step 16: Aadhaar based OTP will be generated for e-KYC
Step 17: Address details filled under given Aadhaar Card will be fetched for Address Details option
Step 18: AO Code details will be fetched
Step 19: Fill all required particulars under the Other Details option
Step 20: Under Documents Upload option, no document is needed to be uploaded.
Step 21: Aadhaar Card based e-authentication is done
Step 22: Aadhaar OTP will be generated
Step 23: Acknowledgment slip for Form 49A along with application number will be generated
Pan Card Photo Signature Resizer :
| (a) | An applicant will fill Form 49A online and submit the form. |
| (b) | If there are any errors, rectify them and re-submit the form. |
| (c) | A confirmation screen with all the data filled by the applicant will be displayed. |
| (d) | The applicant may either edit or confirm the same. |
| (e) | On confirmation, an acknowledgement will be displayed. The acknowledgement will contain a unique 15-digit acknowledgement number. |
| (f) | The applicant is requested to save and print this acknowledgement. |
| (g) | ‘Individual’ applicants should affix two recent colour photographs with white background (size 3.5 cm x 2.5 cm) in the space provided in the acknowledgement. The photographs should not be stapled or clipped to the acknowledgement. The clarity of image on PAN card will depend on the quality and clarity of photograph affixed on the acknowledgement. |
| (h) | Signature / Left Thumb Impression should only be within the box provided in the acknowledgement. The signature should not be on the photograph affixed on right side of the form. In case of applicants other than ‘Individuals’, the authorized signatory shall sign the acknowledgement and affix the appropriate seal or stamp. The signature should not be on photograph. If there is any mark on photograph such that it hinders the clear visibility of the face of the applicant, the application will not be accepted. |
| Signature / Left hand thumb impression should be provided across the photo affixed on the left side of the form in such a manner that portion of signature/impression is on photo as well as on acknowledgement. | |
| (i) | Thumb impression, if used, should be attested by a Magistrate or a Notary Public or a Gazetted Officer under official seal and stamp. |
| (j) | AADHAAR |
| In case Aadhaar number of Individual applicant is entered in the application form, then proof of Aadhaar along with supporting documents is to be submitted to NSDL e-Gov. | |
| If copy of Aadhaar is selected as Proof of Identity/Address/date of birth, then it is mandatory to enter Aadhaar number. | |
| In case applicant is ‘MINOR’, Aadhaar of minor should be mentioned in the application form. (i.e. Do not mention Representative Assessee’s Aadhaar number) | |
| Aadhaar number (if provided) would be authenticated using applicant’s details as mentioned in application form. |
How to Apply for a PAN Card Online?
The Income Tax Department uses the PAN or Permanent Account Number to identify every Indian taxpayer. Initially, it was introduced to curb the rate of tax evasion by individuals and corporate entities. Now, the PAN card acts as a valid ID proof for all Indian residents as well as NRIs (Non-Resident Indians). In this blog, we have covered the topic of PAN card application online. So, in case you are having confusion regarding how to apply for a PAN card from home, then this guide will solve your queries.
How to Apply for a New PAN Card ?
Below we have discussed the four different methods of submitting a PAN card application form:
Method 1: Physical submission of the documents and new PAN Card request form after filling out personal details online
For this, you have to take out a printout of the duly filled form and affix all the prescribed documents to it. Do not forget to attach your recent passport-size photograph. After this sign the paper in the mentioned field(s) and send it to the Protean address via mail.
Method 2: Complete the e-KYC process with the help of your Aadhaar card
If you want your PAN card allotment to be based on information displayed on the Aadhaar card, feel free to follow this method. The Income Tax Department receives your Aadhaar details like official name, date of birth, phone number, etc. and issues a new PAN card with the same set of information.
On utilising Aadhaar-based e-KYC you won’t be asked to upload any photograph or supporting documents. The PAN card is automatically dispatched to the address mentioned in your Aadhaar card.
New PAN Application for Individuals: Step-by-step application process using eKYC and eSign
- Visit the website protean-tinpan.com
- Under ‘Quick links’, click on ‘Online PAN Services’
- Click on ‘Paperless PAN Application’
- On selecting the desired option, you will see a form where you need to register and generate a token (this is a pre-requisite for all types of PAN applications)
- For ‘Application Type’, select option ‘New PAN Indian Citizen (Form 49A)’ from the drop-down and select ‘Individual’ from Category
- Select the appropriate ‘Title’ from the drop-down list and enter your ‘Last Name/Surname’, ‘First Name’ and ‘Middle Name’
- Enter the Date of Birth, Email ID and Mobile Number
- Click on consent check box to provide consent for data usage for purpose of PAN application
- Enter the Captcha code and click on Submit
- On successful registration, token number will be generated and the same would be sent on the provided email ID
- Click on Continue with PAN Application
- Select the mode of application ‘Submit digitally through e-KYC & e-Sign’ option
- Select between Yes or No whether Physical PAN card is required. If ‘No’ is selected, you’ll receive only digitally signed e-PAN at the email ID provided in the application
- Enter the last four digits of the Aadhaar carefully.
- If you are OK with the photograph in Aadhaar to be printed on the PAN card, then select ‘Yes’.
- If you select ‘No’, then you’ll be prompted to select other modes for PAN Application
- Name as per Aadhaar will be picked up automatically
- Data captured on the registration page before generation of the token will be auto-populated
- Select the Gender from the drop-down menu
- Under the parents details section, choose ‘Yes’ if mother is a single parent for Mother’s name to be printed on the PAN card. Please provide father’s name. Kindly note Father’s name is mandatory and from May 1, 2024 even mother’s name will be made mandatory. Please ensure Father’s name and mother’s name is correctly entered.
- Click Next to go to the Contact Details page
- Under Contact Details, select source of income
- Residential address will be captured automatically from Aadhaar
- Select the country code from the drop-down, enter area/STD code
- Telephone/mobile number and email ID would be auto-filled
- After this you would be navigated to AO code i.e. Assessing Office Code section. Select State and City from the drop-down. Based on selection, relevant list of AO codes will be shown. Select the AO code from the list based on available information
- Click Next to go to the Documents Details section
- Proof of Identity, Proof of Address, Proof of Date of Birth will be pre-filled
- For Declaration, select Himself/herself or representative assessee from the drop-down
- Enter the place and click Submit
- On successful submission of details, you’ll be navigated to confirmation screen
- On the confirmation screen, you’ll have to enter the first 8-digits of your Aadhaar and confirm the details
- For editing, select the Edit button and you’ll be redirected to application pages for correcting details else click Next to be redirected to payment page for payment of application fees using various online payment options
- On successful payment, you’ll be navigated to the authentication portal
- Click on consent check box to provide consent for using Aadhaar details for purpose of PAN application
- Then Continue with e-KYC authentication
- On successful authentication, you’ll be navigated to the e-sign portal for digital signing of application
- You’ll have to re-enter your Aadhaar number and provide consent for e-Sign for PAN application
- Click on Send OTP for OTP authentication
- On successful authentication, application will be digitally signed and digitally signed PDF will be displayed on the screen
- You’ll receive your e-PAN within two hours and the physical PAN will be delivered to your doorstep
Method 3: Scan Based e-Sign Method
It is one of the most commonly used methods for PAN card application online. To complete the e-sign process, an applicant first needs to scan and upload the images of the necessary documents along with their photograph and signature on the Protean portal.
New PAN Application for Individuals: Step-by-step application process using Scanned Images through eSign
- Visit the website protean-tinpan.com
- Under ‘Quick links’, click on ‘Online PAN Services’
- Click on ‘Paperless PAN Application’
- On selecting the desired option, you will see a form where you need to register and generate a token (this is a pre-requisite for all types of PAN applications)
- For ‘Application Type’, select option ‘New PAN Indian Citizen (Form 49A)’ from the drop-down and select ‘Individual’ from Category
- Select the appropriate ‘Title’ from the drop-down list and enter your ‘Last Name/Surname’, ‘First Name’ and ‘Middle Name’
- Enter the Date of Birth, Email ID and Mobile Number
- Click on consent check box to provide consent for data usage for purpose of PAN application
- Enter the Captcha code and click on Submit
- On successful registration, token number will be generated and the same would be sent on the provided email ID
- Click on Continue with PAN Application
- Select the mode of application ‘Submit scanned images through e-Sign’ option
- Select between Yes or No whether Physical PAN card is required. If ‘No’ is selected, you’ll receive only digitally signed e-PAN at the email ID provided in the application
- Enter the last four digits of the Aadhaar carefully
- Enter the name exactly as it appears on Aadhaar
- Data captured on the registration page before generation of the token will be auto-populated
- Select the Gender from the drop-down menu
- Under the parents details section, choose ‘Yes’ if mother is a single parent for Mother’s name to be printed on the PAN card. Please provide father’s name. Kindly note Father’s name is mandatory and from May 1, 2024 even mother’s name will be made mandatory. Please ensure Father’s name and mother’s name is correctly entered.
- Click Next to go to the Contact Details page
- Under contact details, select source of income and enter residential address
- Select the country code from the drop-down, enter area/STD code
- Telephone/mobile number and email ID would be auto-filled
- After this you would be navigated to AO code i.e. Assessing Office Code section. Select State and City from the drop-down. Based on selection, relevant list of AO codes will be shown. Select the AO code from the list based on available information
- Click Next to go to the Documents Details section
- Select Proof of Identity, Proof of Address, Proof of Date of Birth from available list of options
- For Declaration, select Himself/herself or representative assessee from the drop-down
- Enter the number of documents enclosed
- For Upload Photo/Signature section:
- Upload photo in the following format: Only .jpg extension file allowed; DPI lesser than 200 dpi; 3.5(H) x 2.5(W) cms; Maximum file size: 50kB
- Upload signature in the following format: Only .jpg extension file allowed; DPI lesser than 200 dpi; 2(H) x 4.5(W) cms; Maximum file size: 50kB
- After successful upload, you will be able to see the preview of the photo and signature in the box
- For Upload Supporting Documents, documents should be in accepted specifications i.e. file should be in PDF format and the size should not exceed 300 kB. You can add more documents by clicking on Add Documents
- Click on Submit once done. On successful submission of details, you’ll be navigated to confirmation screen
- On the confirmation screen, you’ll have to enter the first 8-digits of your Aadhaar and confirm the details
- For editing, select the Edit button and you’ll be redirected to application pages for correcting details else click Next to be redirected to payment page for payment of application fees using various online payment options
- On successful payment, you’ll be navigated to the authentication portal
- Click on consent check box to provide consent for using Aadhaar details for purpose of PAN application
- Then Continue with e-KYC authentication
- On successful authentication, you’ll be navigated to the e-Sign portal for digital signing of application
- You’ll have to re-enter your Aadhaar number and provide consent for e-Sign for PAN application
- Click on Send OTP for OTP authentication
- On successful authentication, application will be digitally signed and digitally signed PDF will be displayed on the screen
- You’ll receive your e-PAN within two hours and the physical PAN will be delivered to your doorstep
Things to Consider While Applying for a PAN Card Online
To ensure the successful allotment of the PAN card, you have to request the issuance of Form 49A. After you fetch the form online, please make sure to follow these pointers:
- You can submit the PAN card application form by following any of the above-mentioned four methods.
- You can use the temporary token number assigned to your form to make changes in the details before final submission.
- The submission should pass all the validations. So, if any relevant error pops up, edit and re-submit the form.
Later on, with the help of a security code and acknowledgement number, you can track the status of your PAN card application.
Why Should You Prefer PAN Card Application Online?
Applying for a PAN card online is very easy. All you have to do is upload scanned copies of your supporting documents. As soon as you upload the files, the necessary information is updated in the database within 24 hours. As a result, the applicant gets their PAN card within 7-10 days.
What is ePAN?
The e-PAN service was launched by the Indian Government to instantly disburse virtual PAN cards to Indians. To request the issuance of a digitally signed ePAN card, you have to initiate the process of Aadhaar-based e-KYC by visiting the e-filing portal of the Income Tax Department.
Next, you must enter your Aadhaar number and check a few boxes before validating the details displayed on your device screen. Finally, your PAN card will be generated with the ‘Download’ option.
Documents Need to Apply for a New PAN Card
Every Indian citizen must present the following documents to get a new PAN card:
- Proof of identity (Aadhaar card/ Voter ID card/ Passport/ Driving licence/ Central Government health scheme card)
- Proof of Address (any utility bill/ bank account statement/ credit card statement/ Domicile certificate)
- Proof of Birth (Birth certificate/ School leaving certificate authorised by a recognised Board/ signed affidavit before a Magistrate mentioning your DOB)
Guidelines for Submitting PAN Application through UTIITSL website/portal and Making payment online |
|||||||||||||||
| option now available for Form 49A (for Resident Indian Applicants), Form 49AA (for NRI/Foreign Citizen) and CSF (for Change/Correction in PAN Card details): | |||||||||||||||
| International cards are not accepted, use Indian cards for making the requisite payments. | |||||||||||||||
| 1) Applicant should fill in his/her New PAN Application Form 49A “online” through UTIITSL’s site http://www.utiitsl.com/ under the menu option Services->PAN Card->Apply. Instructions for filling up the form as provided on the website should be followed while filling up each information on the form. | |||||||||||||||
| 2) Applicant should click on “Validation” followed by “Submit” button once the application is filled in. | |||||||||||||||
| 3) The filled-in application form is visible on the screen for thorough verification by the applicant. Applicant should verify it for correctness of the information being submitted. | |||||||||||||||
| 4) If verified correct, Applicant can now go ahead with making online payment by clicking on “Make Payment” button on this form | |||||||||||||||
| 5) Applicant will be re-directed to Payment Gateway site now by choosing either of the available gateway options – BillDesk and PayU India. Here applicant is free to choose any of the gateways depending on applicant’s payment card issuing bank option available in the two options. | |||||||||||||||
| 6) Applicant needs to carry out the payment attempt with his/her card details using one of the following options: Netbanking, Credit Card (Master/Visa), Debit Card (Master/Visa), Cash Card or any other as seen available on the Payment Gateway site. | |||||||||||||||
| 7) Applicant may get a “Success” or a “Failure” as a result of this online payment attempt, accordingly the message will be displayed clearly. | |||||||||||||||
| 8) On payment “Failure”, message of failed transaction will be system-endorsed on the filled-in form visible on the screen. Applicant may either Cancel, go back OR Retry making the payment. | |||||||||||||||
| 9) On payment “Success”, payment confirmation will be system-endorsed on the filled-in. | |||||||||||||||
| 10) For “Success” cases, Applicant should “Save” OR take a print-out of the filled-in form visible on the screen through the “Print Form” option provided. | |||||||||||||||
| 11) On the printed form, Applicant should affix two (same) photographs of 3.5cms X 2.5cms size. | |||||||||||||||
| 12) Applicant should sign at the 3 specified positions on this photo-affixed form as follows: ■ On the left hand box, sign across the affixed photograph. ■ On the right hand box, sign below the photo in the space provided. ■ On page 2 of the form, sign in the bottom right hand box in the space provided. |
|||||||||||||||
| 13. With the signed PAN Application form complete as above, Applicant should attach copy of the documents being submitted as Proof of Identity, Proof of Address and Proof of Date of Birth strictly as per information provided in the filled-in form: | |||||||||||||||
| 14) Applicant is now ready with the complete set of application that includes one filled-in, signed, photo-affixed PAN Application form endorsed with “payment confirmation” alongwith the three supporting documentary proofs. | |||||||||||||||
| 15) Applicant should submit or dispatch this complete set of his/her application to the nearest UTIITSL office address below at any one of Mumbai, Kolkata, Chennai or New Delhi regions for processing and issuance of his/her PAN Card. | |||||||||||||||
|
Attention PAN Applicant “As per instruction from Income Tax Department, an authorized agencies’ agent may visit you for your identity and address verification as per the documents submitted by you with the PAN application form. You are requested to ask authorization letter/ID card from the agent before verification. Your cooperation is solicited in this regard.” |
|||||||||||||||
|
|||||||||||||||
|
|||||||||||||||
Pan Card Photo Signature Resizer FAQ :
1.What is the size of PAN photo ?
IN NSDL – Photo & Signature all in 200 dpi, Photo 20 kb, signature 10 kb.
IN UTI – Photo 300 signature 600 DPI , and size in Kb – Image 30 kb, signature 60 kb
2. How to change PAN card photo and signature ?
Visit official website and apply ( NSDL/UTI)
3.What is the signature size for UTI PAN card?
600 dpi and 60 kb